
Basic Stucco Repairs

Popularly recognized for its versatile look, ready accessibility, and sturdiness, Portland cement plaster, also known as Stucco, remains a common finish for countless buildings, from commercial to residential.
However, every exterior plaster does not necessarily have to be stucco. Stucco is a particular type of exterior plaster. Products known as “exterior plaster” are created from a blend of lime, plaster of Paris and water. Stucco, however, is prepared from Portland cement, lime, and sand. These variances in materials can determine where the material can be used and how it can be applied.
Plaster can be applied to both the interior and exterior of a home. On the other hand, stucco is best applied only on the exterior. This is due to the fact that stucco tends to be rough in texture and more resilient than other variations of plaster. However, exterior surfaces must be properly prepared before stucco can be applied. Exterior plaster, therefore, is more versatile in this regard; unlike Stucco, it can apply to a variety of smooth surfaces, such as drywall or concrete.
A stucco wall is attractive in appearance, but it is important to note that stucco itself has no strength and cannot, therefore, hold up any weight. A stucco wall has to be reinforced by some load-bearing material, such as wood or concrete. However, Stucco can be applied directly to brick walls, concrete walls or cinder block.
Stucco can last for up to 100 years or more, but that doesn’t mean it cannot be damaged. Cracks and holes that occur over time let in moisture that can quickly lead to further damage to the stucco and the primary surface it is adhered to, resulting in unfastened areas that can expand over time.
Water is one of the chief culprits in plaster deterioration. Therefore, moisture management is of utmost importance in a stucco installation. Moisture can enter buildings through cracks, through window and door openings and even through the roof, leading to rust and rot. However, Stucco is a breathable material that allows moisture to pass through; that means it is capable of drying out and does not trap moisture.
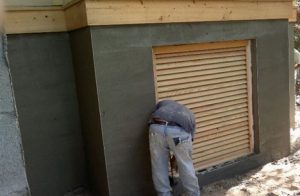
Older plaster surfaces can become damaged or washed out upon exposure to weather elements such as rain, snow, and sunshine. In any case, Stucco repair is a direct process that can restore the surface back to its original condition.
Making sure that the walls are structurally whole and have no unseen problems are essential before beginning any repairs. This is to ensure that seemingly minor issues are not overlooked and covered up only to end up becoming major problems in the future.
A comprehensive restoration procedure that involves removing the loose material, fixing new building paper and metal lath, and applying three coats of stucco repair mix must be carried out in areas of stucco that have come loose or completely fallen away.
Minor surface cracks tend to appear on stucco walls that were not properly cured before installation. This may not seem like much, but even minor cracking can reduce the aesthetic quality of an otherwise good quality wall. A new finish treatment made of Portland cement-based paint or a mixture of cement and pigments, occasionally called a fog coat can be a quick solution, as long as cracks are not too extensive to the extent that water passes through them. Updating the color of your wall plaster in order to give your building a new look can be another reason to re-coat your plaster wall.
Make certain you are using a good-quality premixed stucco repair mix to ensure that you get the right blend for the application, which is a lot more accurate and reliable than most of the popular traditional stucco recipes. These pre-mixed products are known for exceptional potency and bonding and can be applied and colored just like the regular stucco. Another advantage is that pre-mixed stucco repair mix contains a quick-setting formula which dries much more quickly than the traditional homemade stucco, making the repair process considerably more rapid.
In most cases of stucco repair, it is usually best to consult trained professionals because a poorly implemented repair won’t last and might conceal the problem until even more damage is done.
With that been said, here are a few steps to basic stucco repairs.
Remove the Loose Stucco
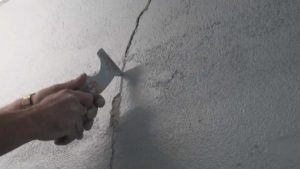
Get rid of all loose or damaged stucco in the repair area by gently tapping it with a hammer and a chisel. Confiscate the loose pieces until you reach sturdily adhered stucco along the entire boundary of the area. Be alert so you don’t end up damaging the underlying wood lath or sheathing.
Cut out along the perimeter, any metal lath under the stucco using metal snips and then remove all nails or screws holding the lath in place and take out the lath from the wall.
Add Building Paper
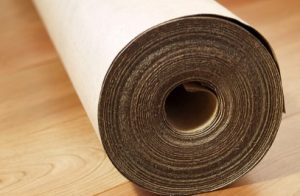
Cut two pieces of grade D building paper to fit the affected area. Each piece should protect all exposed wood materials to form an effective moisture barrier.
Attach the first piece of paper to the wood lath or plywood sheathing with staples as applicable. Thereafter, you can staple the second piece of paper over the first.
Install Metal Lath
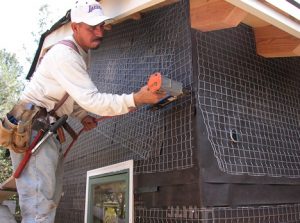
Using metal snips, cut a piece of galvanized metal mesh stucco lath. As with the building paper, the lath should fit the affected area so there are no spaces between the lath and the perimeters of the original (well-adhered) stucco.
Place the lath over the building paper and secure it with galvanized roofing nails. The nails must be lengthy enough to penetrate at least 1 inch into the wood framing members behind the original lath or, if the wall has plywood sheathing, nails should pierce the full depth of the sheathing.
Mix the First Batch of Stucco
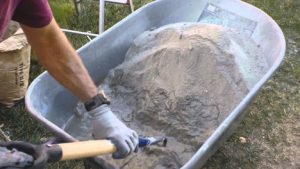
Following the manufacturer’s directions, mix a batch of quick-setting repair stucco. You can do this using a drill and mixing paddle or, for huge quantities, a mortar mixer.
Keep the mixed stucco in a cool area and be prepared to apply it as soon as it is mixed. Quick-setting stucco usually has a working time of 45 minutes or less, so mix only as much as you can apply in that time.
Apply the Scratch Coat
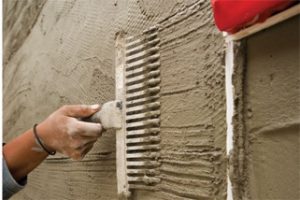
Spray the edges of stucco around the affected area with water (to check premature drying of the new stucco). Scoop a fist-size amount of wet stucco onto a trowel, then sling the stucco onto the metal lath to embed the wet mix into the openings in the mesh. Ensure the stucco is able to hold onto the mesh without support.
Repeat this process a number of times, ensure you cover the complete patch area, then polish the stucco into a flat, even layer that is within 1/2 inch of the original stucco surface. Carefully press and smooth the wet stucco along the edges of the patch to bond the new stucco with the old.
Scarify the scratch coat with a trowel or scarifies, then let the coating cure as directed by the mix manufacturer. If needs be water-cure the stucco by spraying water on it periodically. Curing may take only one to two hours, depending on the conditions and the stucco product.
Apply the Brown Coat
Mix another batch of stucco, this time for the second/brown, coat. Use a trowel to apply the stucco to the patch surface in a smooth, even layer that is recessed 1/8 inch from the surrounding original stucco. Let the brown coat cure as directed, misting with water, as applicable.
Apply the Final Coat
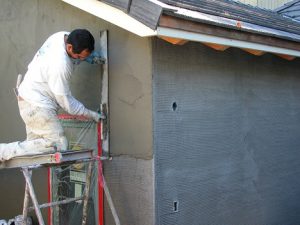
Mix a batch of stucco for the final, or color, coat. You can use a normal or if you choose a custom-order color to achieve the desired look of the coat. However, it is very tiresome to color-match a patch so that it blends with the surrounding stucco; hiding a patch completely often requires painting or coating the entire wall with a compatible paint or pigmented coating.
Apply the final coat with a trowel so it is flush with the surrounding area. If you require the texture of the coat to match the initial finish, ensure you blend until it does. Let the stucco cure as directed.